Looking for a way to create email sequence & Send Automatic Follow up sequence mails in Gmail with attachments? Auto Reply Pro Add-on for Gmail lets you create customised sequence email with file attachments which are triggered at time intervals specified by you while setting a follow up for Gmail. Not just that you can configure them to stop when a email is sent or eceived for the thread.
In the Tutorial below we will guide you about how to create email sequence and send Automatic follow up emails in Gmail with attachments.
If you have not installed the Add on yet, then please Click here to install Auto Reply Pro Add-on from Google Marketplace
Need help with How to install the Add-on please click here to read installation tutorial.
a) To get started with setting up auto response rules click the Add / Manage Rules button to open the Auto Reply App in Browser.
b) If you’re logged into multiple Google Accounts in same browser. To access Auto Reply App, please Log out log in to the account as a primary account in which the Add-on is installed and you wish to use. Alternatively, you may Log in to this Account in incognito window / private window in Browser.
c) Please allow pop-ups for Gmail in Browser. Please read Step 2 about how to allow pop-ups in Gmail.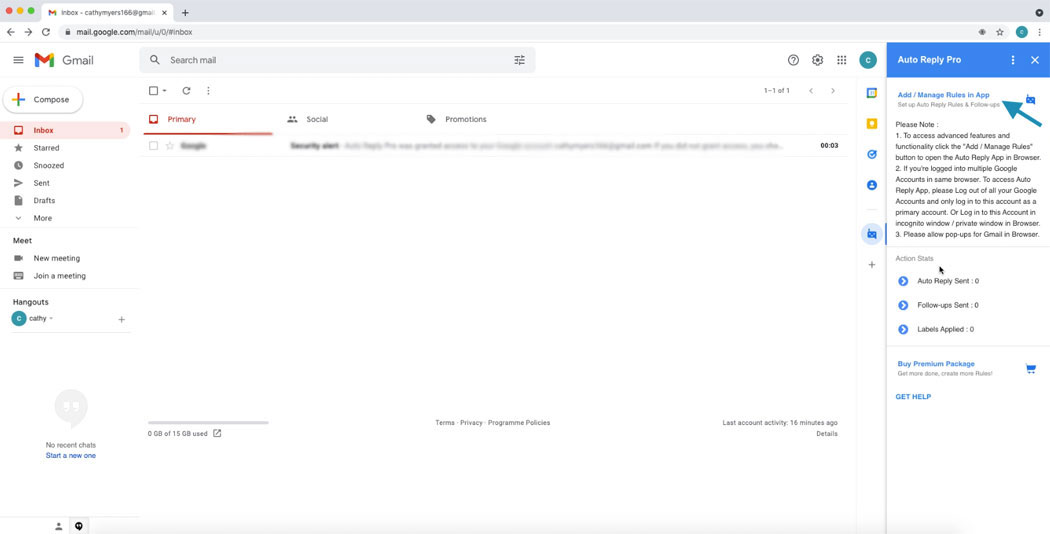
a) In case you notice a Pop up blocked notification, while trying to open dashboard from Gmail.
b) In the address bar, click Pop-up blocked see image below.
c) Click the link for the pop-up you want to see.
d) To always see pop-ups for the site, select Always allow pop-ups and redirects from [site] > Done.
Once you click the Add New Follow-up button, please type a name that helps identify this email sequence follow-up for Gmail. Like in the below example we are planning to create Automated Follow-ups for assigning to emails received related to pricing queries. Click next to move to the next step Set Conditions.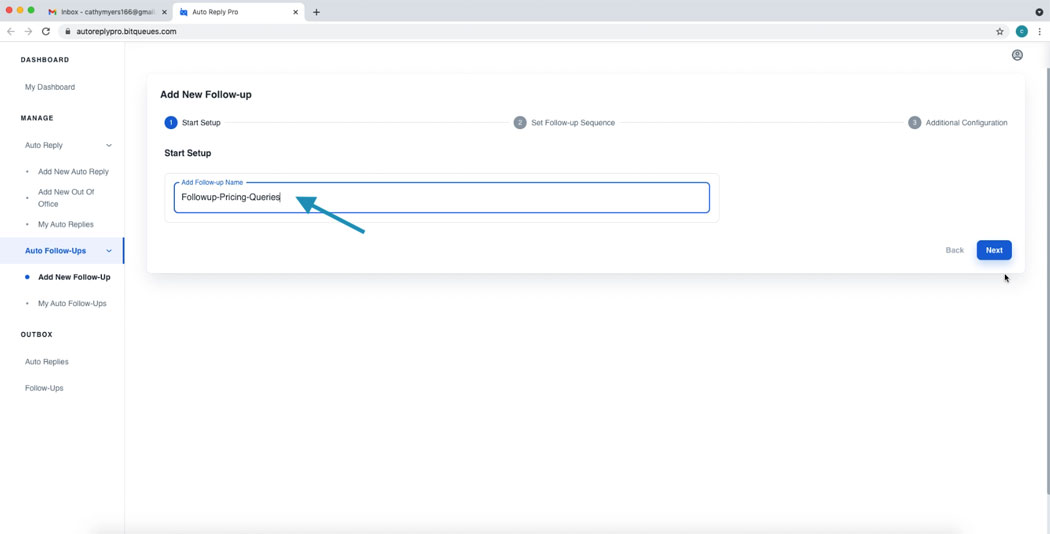
Please click Add Step button to start adding email templates to be sent in the sequence you prefer. You May add up to 10 steps for a sequence while configuring the follow up. So that up to 10 email will be sent at defined intervals from the day the Follow-up is assigned to an email thread.
Please add the number of days to wait for field before this email is automatically sent. 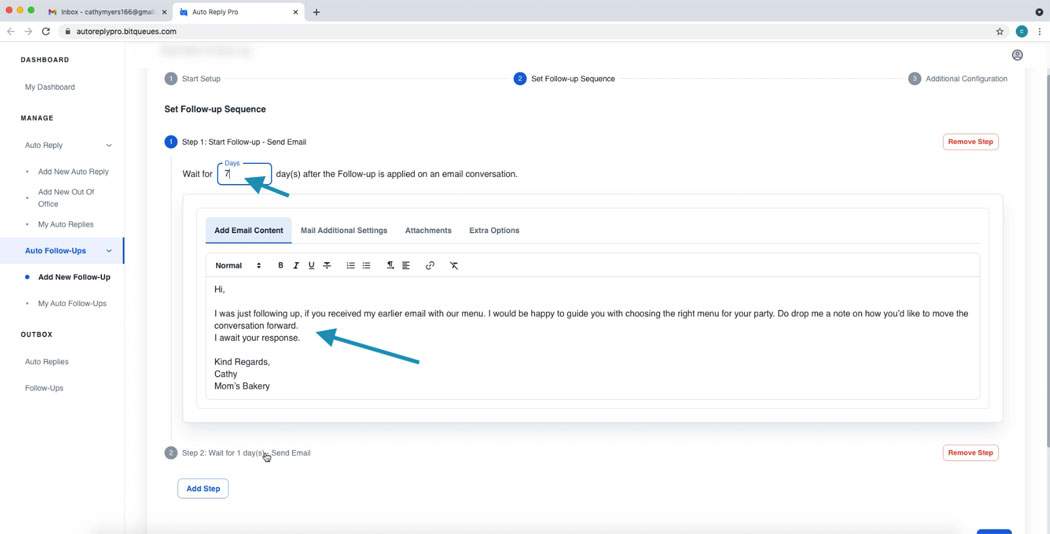
Click Add Step button again and repeat the steps to add more emails to the sequence of emails.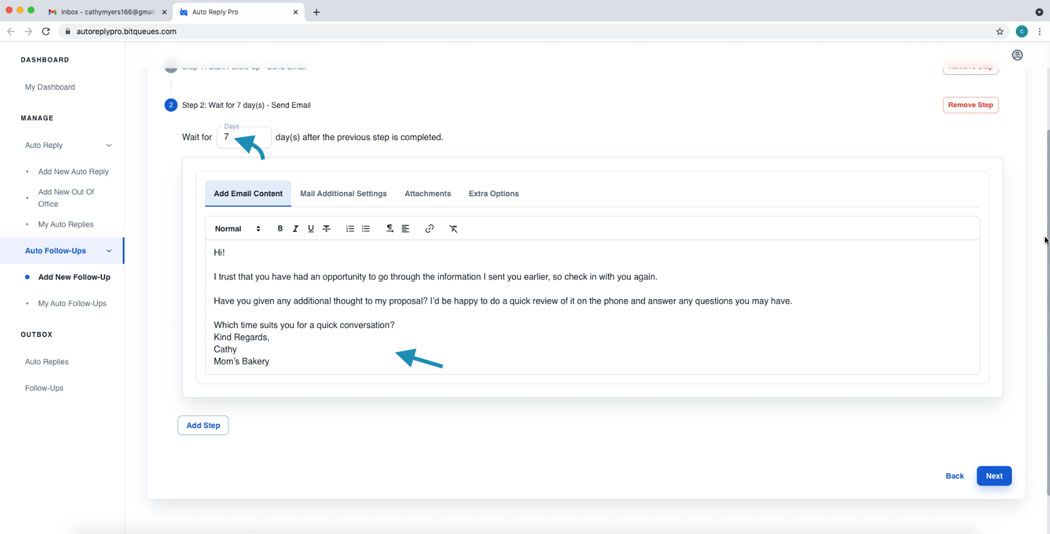
You may click Remove Step button to remove any step before you finalise this Automated Follow-up mail sequence.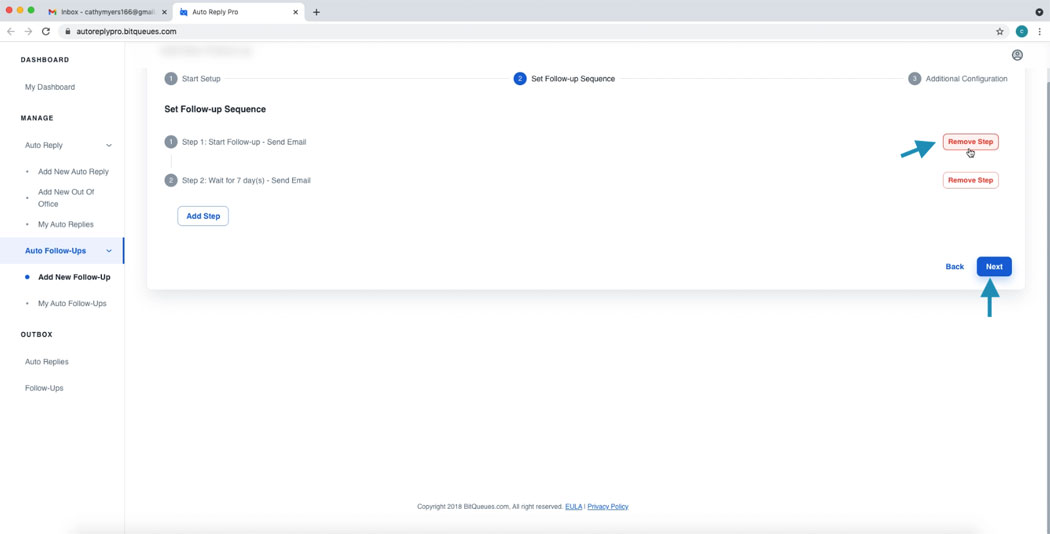
You have a choice to further customise and add any recipients you would like to be Cc, Bcc on these follow up emails by adding their email address in the Cc,Bcc field.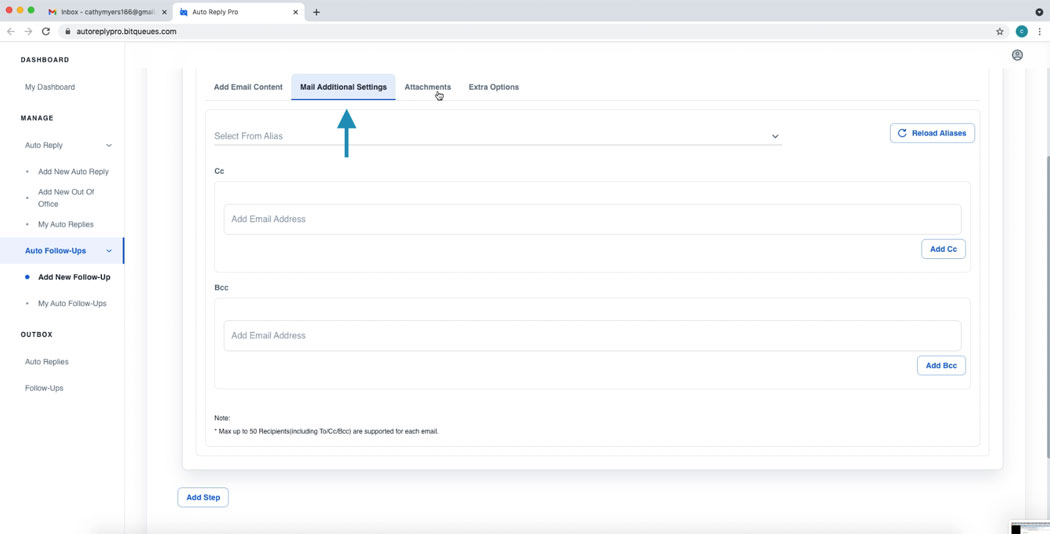
Auto Reply Pro allows you to add email attachments to your Follow up Emails if required. Very helpful if you are looking to attach some Presentation, Brochure or Marketing materials along with your Email content.
– Attachments are Limited to max 10 files and overall size 10MB per email.
– All previously loaded attachments files are also available under your Attachment library, So, you don’t have to upload the attachments again and again.
To insert and upload a file from your device. Click on Insert from Computer Device Button. To access previously uploaded file click Insert from Attachment Library button and choose your file to attach from the list.
1. If you choose to upload a file from our computer.
2. Next Click Select file from device.
3. Select the file you wish to upload and click open.
4. Now Click upload and the file will be uploaded and attached to this email template. Also, the file will now be available under attachment library if you need to attach it to any other email template.
5. You can see the file name listed under attachments.
6. If you wish to remove it click the X icon on the far right side.
Repeat the above steps to attach up to 10 files with combined file size not exceeding 10MB.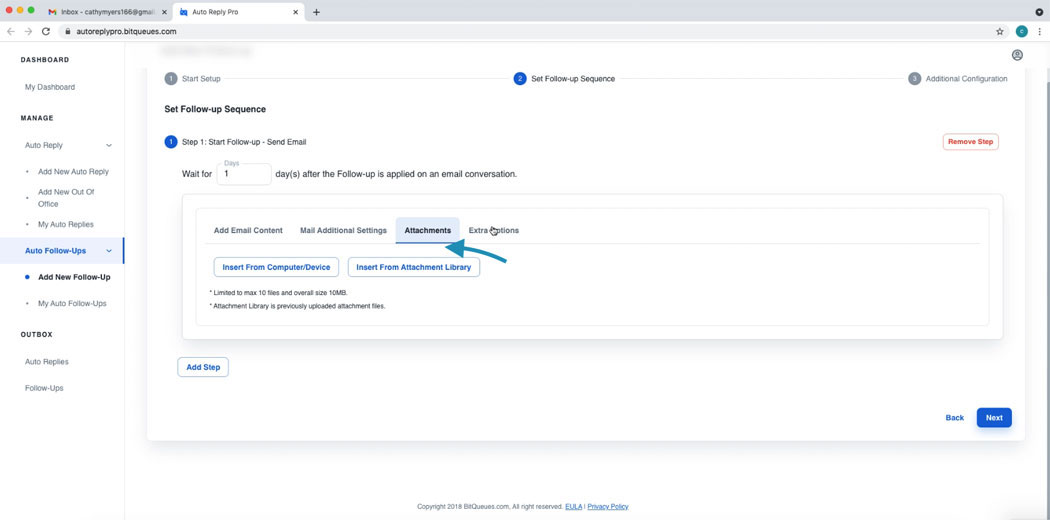
You may choose to set some extra options like sspecifiying a custom name for the step to help recall what the email template content is about for that step. You can choose to assign label to Automated Follow up Response emails for easy identification or to organise emails. If you haven’t created any labels yet, you can create in Gmail interface and click Reload labels button to choose from the list. 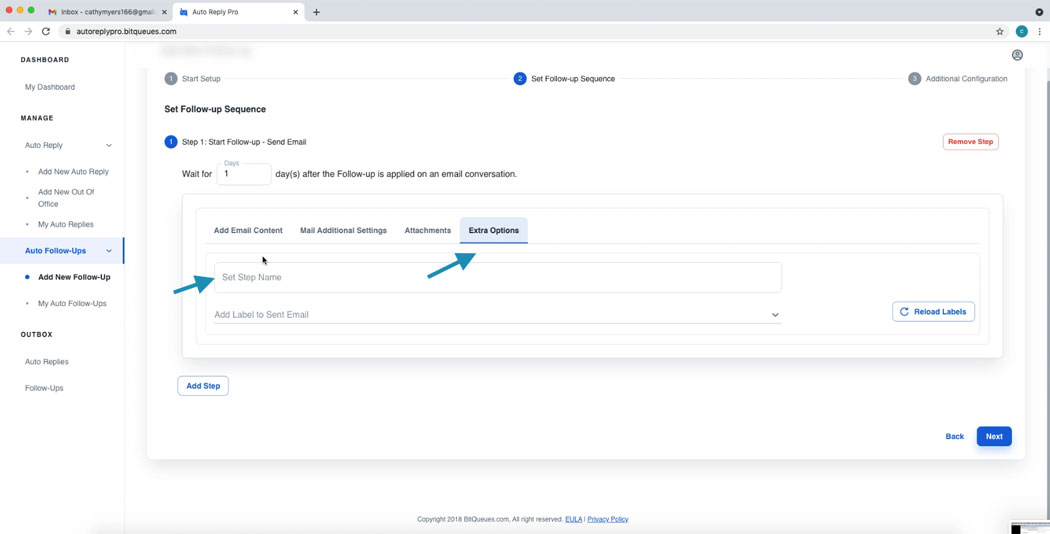
We are presented with Additional Configuration options, that is would you like the Auto follow ups to stop in case a Mail is received or sent on the thread on which the follow up is applied. If you uncheck these check boxes the follow ups will sent irrespective of any email received or sent.
Click Create Follow-up button to create your first follow up mails sequence for Gmail. 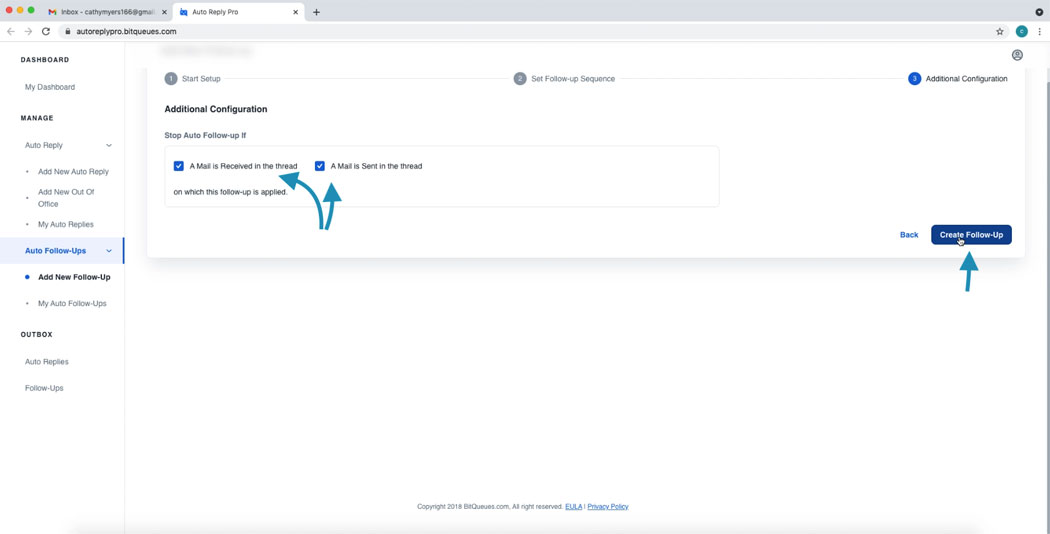
From the left side bar menu Please follow the path Auto Follow-ups > My Auto Follow-ups. This should list all the existing Auto Follow-ups you have created.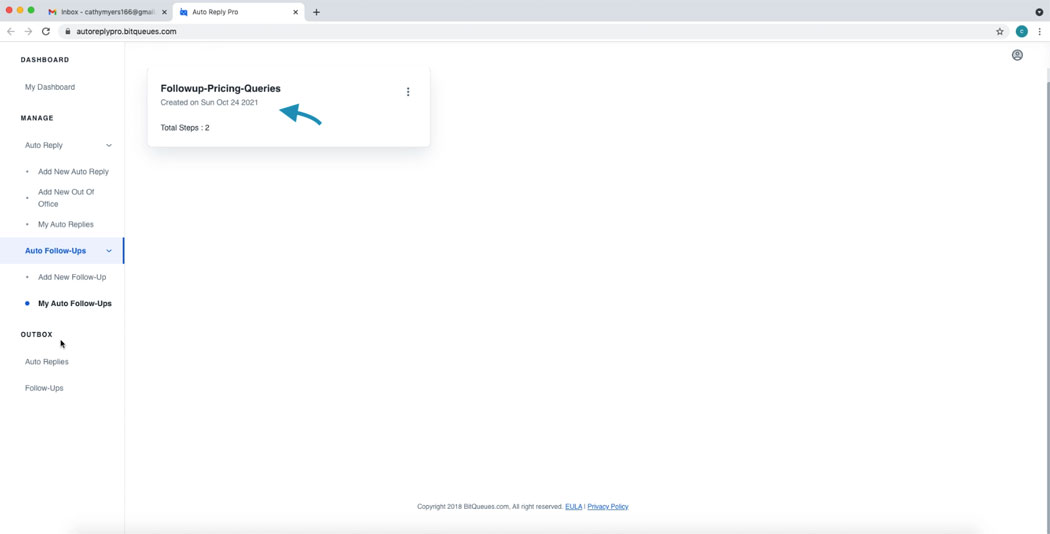
While logged in to Gmail, while you are reading any email. Please click the Auto Reply Pro Add-on icon from the right side bar. You can select an already created Follow-up from the Drop down list and click the Apply button. 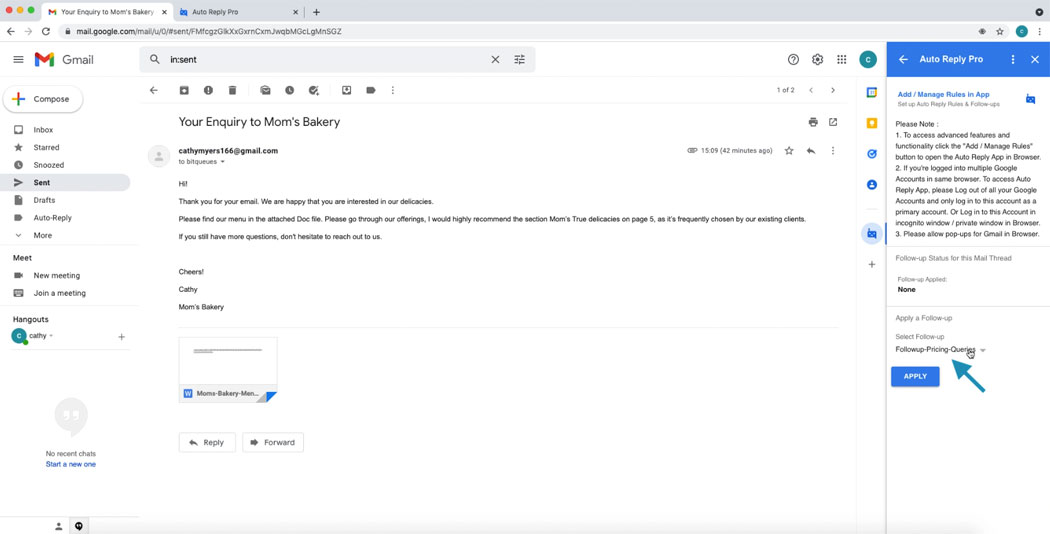
Once you have applied the follow up it will show the next scheduled mail step from the sequence and date the automated follow up mail is going to be sent to this contact. As you can see below the follow up is assigned exactly after 7 days as set in send after days field while creating the Follow up. 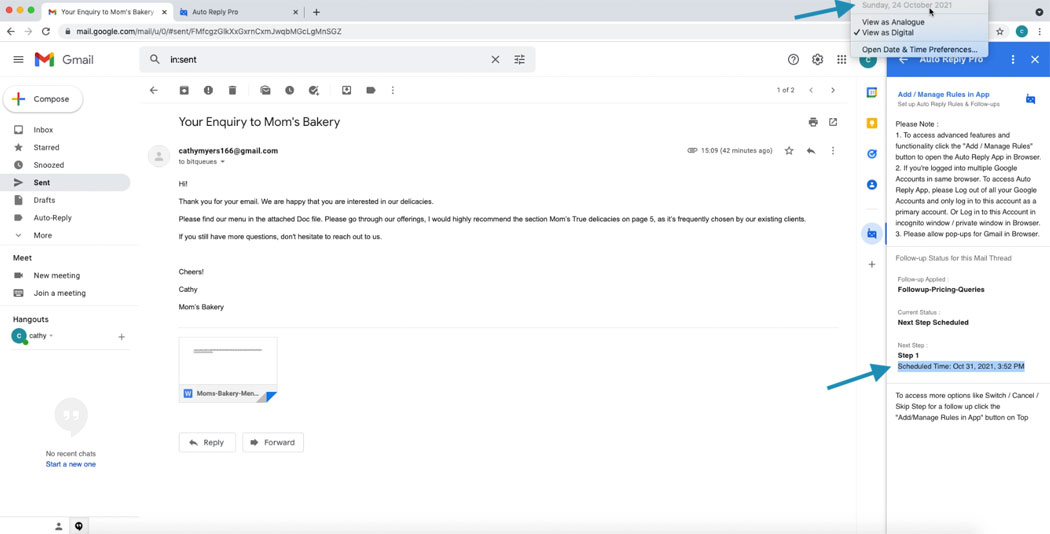
Now we have created and assigned a Follow up to an email. Next question is , what if we need to reschedule or skip any of the step in the sequence. We need to open the Auto Reply App to access Skip/ Reschedule / Cancel the Follow-up.
Click Add/Manage Rules in App to Launch the Auto Reply Pro app in another browser tab.
From the left menu follow the path Outbox > Follow-ups and you will see the Scheduled Follow-ups listed in the list with current status. Click the three dots icon on the far right in the row under current status section. 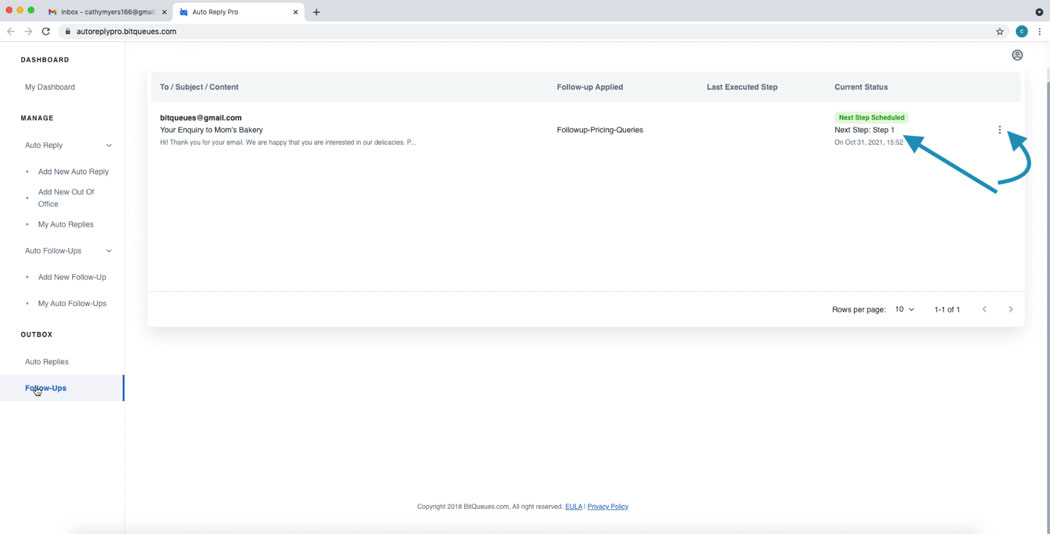
You’ll get Skip Scheduled Step, Change Scheduled time or Cancel the follow up.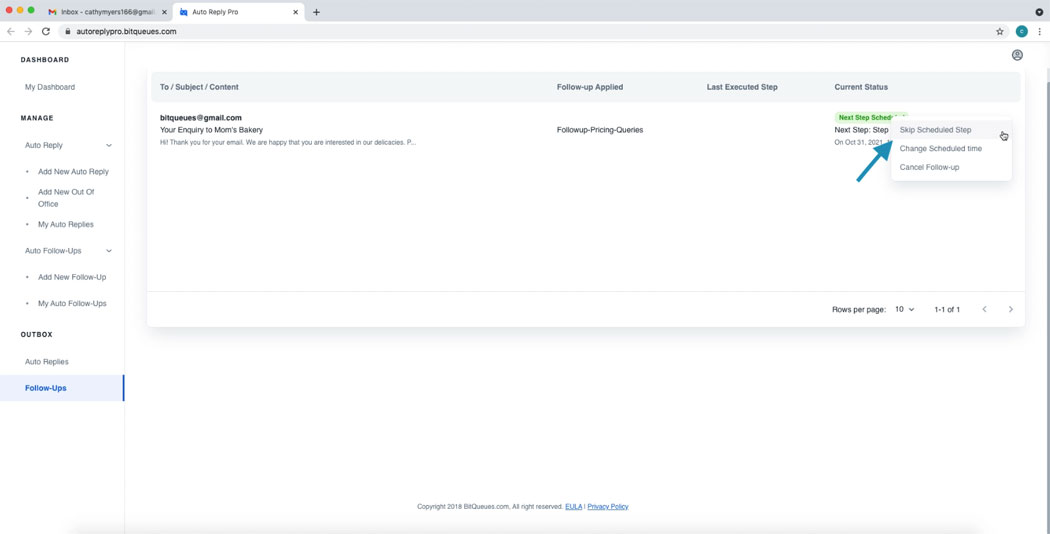
Let’s reschedule the timing for the first step to few minutes for now to test the automated mailing feature of the Add-on. Click Change Schedule time.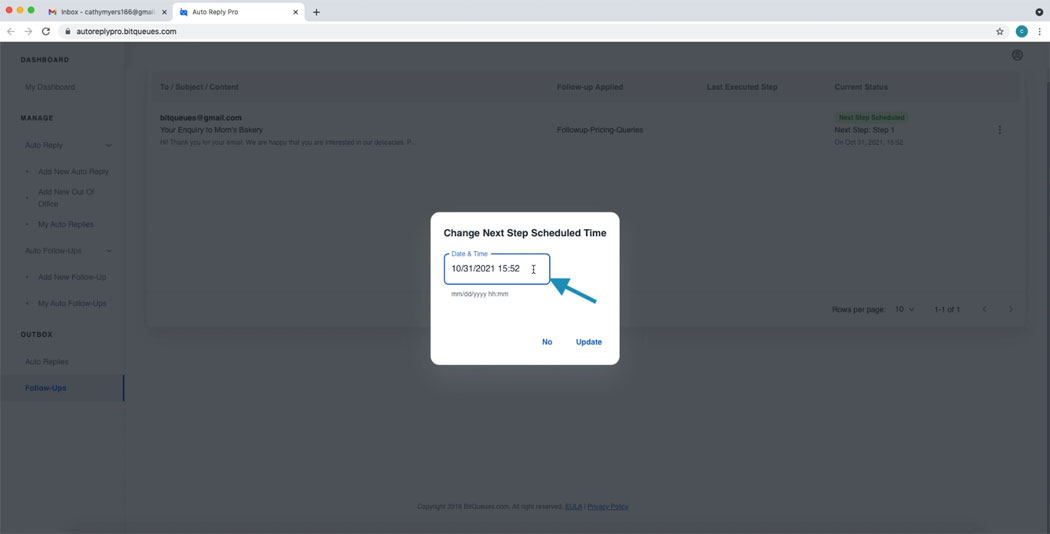
Now click the text box and a clock will pop up. Select hours to adjust hours and select minutes to change minutes. Click OK when you are done. 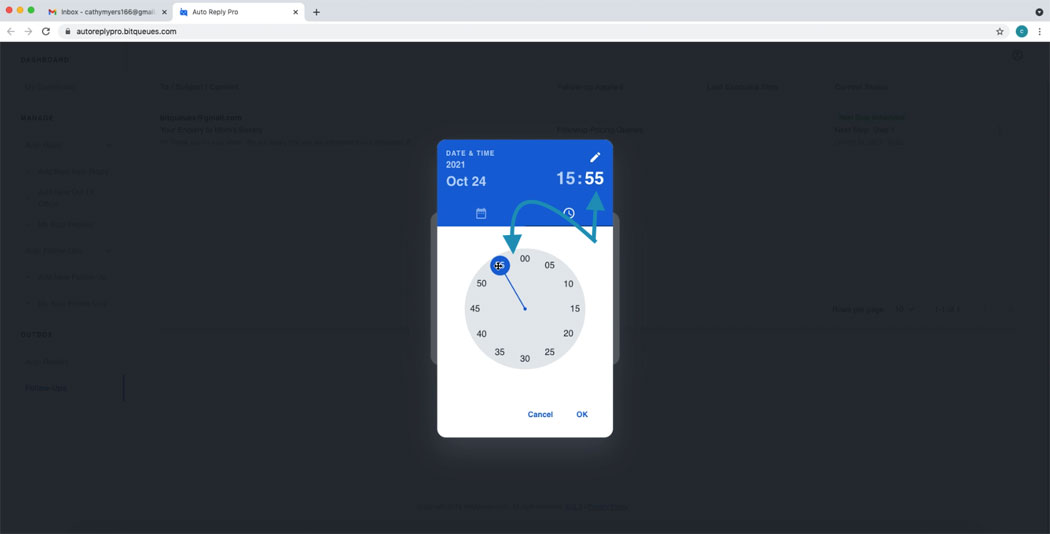
Click update for the change to take effect. 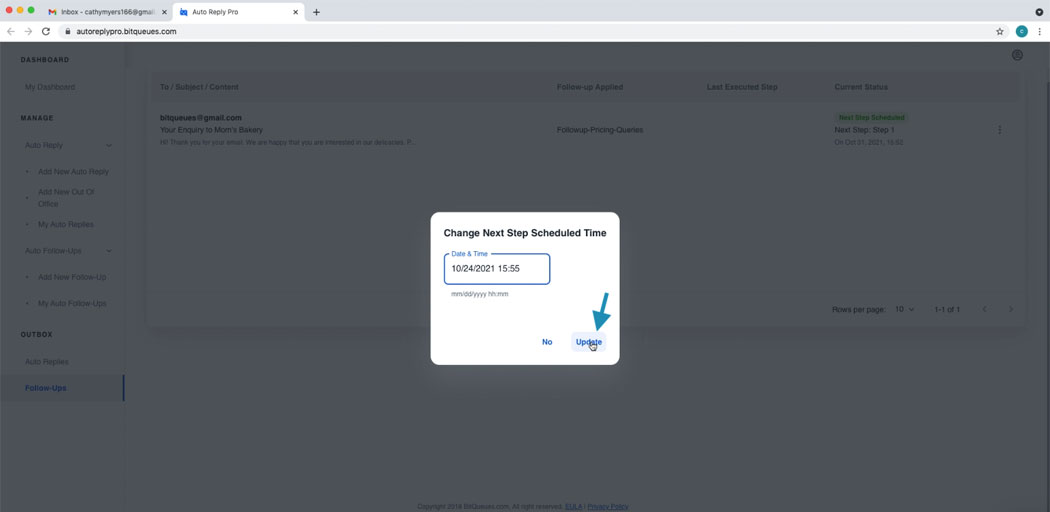
Once the follow up mail is sent, it will be reflected under the dashboard and Outbox status.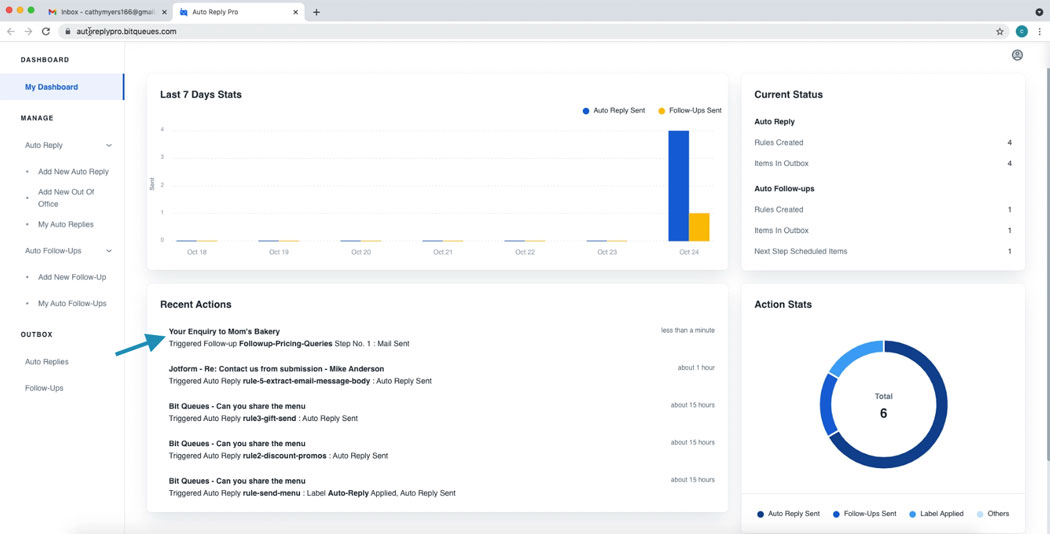
The Status is also updated and visible when you access the Auto Reply Pro add-on in Gmail from Right Side bar. 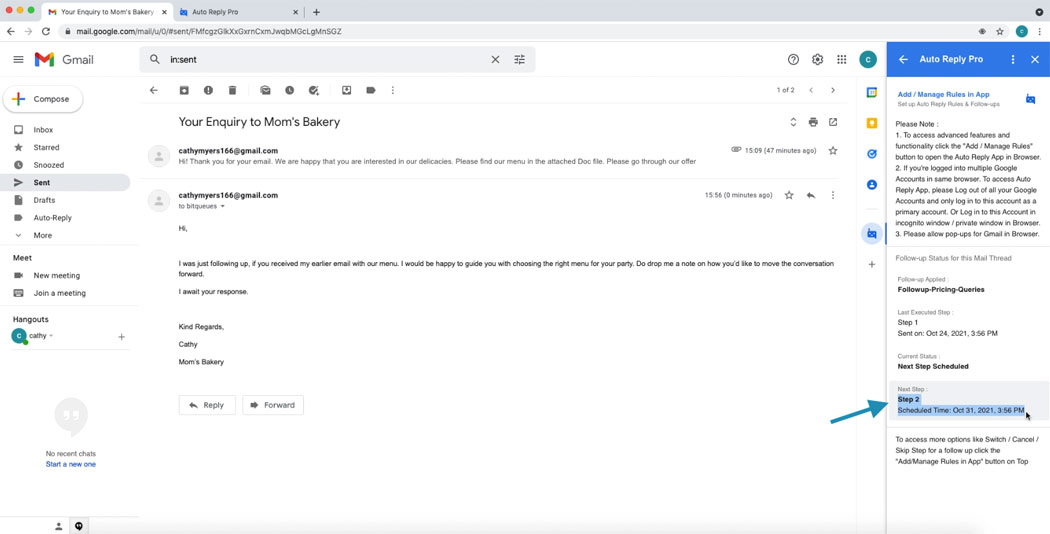
We hope it is now clear to you how to add Follow ups mail sequences in Gmail using Auto Reply Pro. You can create and add more Follow ups as many allowed under your plan.